“Everyone wants to climb a tallest peak, it is often much more difficult and pristine to climb a second tallest peak.”
At 14,380 ft, Mt. Williamson is the second highest peak in California (5th highest in lower 48). To reach it you must suffer through an unrelenting 10,000 feet of gross elevation gain over 12+ miles. As a result you’ll find yourself mostly alone compared to other 14ers, like Whitney or Shasta where I could see a line of people coming up Avalanche Gultch. When the four of us were on the mountain over August 28-30, 2015 we encountered just two other people trying to summit the mountain the day of, a few trail runners single-day peak bagging and a half dozen other backpackers the entire trip.
If you are just looking for quick information, check my trail route and the summary below:
- Bay Area (100 ft) to Shepard’s Pass Hiker’s Trailhead (6,308 ft): 8 hrs driving
- Shepard’s Pass Trailhead to High Camp (just past Pothole) (11,306 ft): 6:20 hrs up / 3:40 hrs down
- High Camp to Williamson Bowl Rim (12,451 ft): 2:45 hrs up / 1:30 hrs down
- Traverse across Williamson Bowl: 1:45 hrs in / 1 hrs out
- Williamson Base (12,142 ft) to Summit (14,380 ft): 3 hrs up / 2:30 hrs down
Reaching Shepard’s Pass
On Thursday we left the Bay Area around 4pm, picked up our permit around 1am via a night drop off. You’ll need to have some directions to navigate the few turns on the rutted, bumpy backroads heading towards the Shepard’s Pass Hiker Trailhead (not the stock trailhead) once you get off the main road. We bottomed out once, but if you keep a tire on the big rocks you can can a car down there. We were driving a Chevy Cruze. Reaching trailhead at 1:45am there wasn’t much for level-ground camping up the trail so we pitched our tents a few 100 feet from the trailhead and a few dozen feet off trail.
The Saddle
At 6:30am we woke to the sound of trail crews coming to make the trail passable by stock to fix a washout further up trail. After checking our permit and bear buckets the ranger went on his way and we were off around 7:30am up the trail. We considered there might be no water until we reach Anvil camp so we packed 3L of water each.

The good thing about the trail to Shepard’s Pass is there are no junctions, there is no real way to get lost. The bad news is the trail is a constant up for the next 3.5 miles and 2,400 ft until “the saddle”. Despite a lot of training with a pack, the uphill felt pretty grueling with the intense sun, but we made it in good time at 2.5 hours. Once we hit “the saddle”(8,376ft) the trail kicked over to the valley we’ll follow up to the pass the rest of the day. From the saddle the trail descends for 600 ft, 1.5 miles. Despite these small numbers, the hour it took us downhill felt like forever after working so hard on the uphill side of the saddle.

Anvil Camp
After that down, the trail returns to its un-relenting upward trajectory. This section is less steep than up the saddle, is mostly unshaded and ropes along the side of a mountain. Despite the decrease in grade, we’ve already been hiking for 4.5 hours and this 3 miles and 1,800 ft takes us about 3 hours until we reach Anvil Camp at 10,000 ft. Right before Anvil Camp we experienced the washout rangers had told us about weeks prior that was in their words, “um… its passable”.

30 yards wide and 20 yards deep it actually wasn’t very difficult to traverse and we were on the other side in no time. Shortly after we reached an oasis of trees, green and water. This was Anvil camp.

We were pretty worn out over the past 7.5 hours of hiking (8 miles, 4,200 ft) to Anvil camp so we took a rest for a couple hours as we refilled, refueled and rehydrated. By Anvil almost everyone’s water was running on empty, but luckily all the streams were running strongly and the lakes were full throughout our trip. As a bonus, while resting we experienced a doe and her two fawns come 20 feet from us as we rested.
Pothole
From Anvil we decided to save ourselves an extra extra thousand feet on summit day by going up to Pothole. It took us about an hour to get to the Pothole area at 11,000 ft, but there actually isn’t anything that really looks like a Pothole so we walked right by it right up to the talus field approach for Shepard’s Pass.

Later we realized the Pothole was the last bit of green space we saw after leaving Anvil about 45 mins in. Preferring not to go back, we found a large flat place just off trail to pitch two tents that was 70 ft down trail from the last stream crossing in Shepard’s Pass. If you are looking to camp at Pothole, know there is a stream crossing there too. We ended up going to sleep around 7 or 8pm that night.
Shepard’s Pass
We woke up at 4:45am after some horrible sleep. The moon was so bright I looked outside the tent at 2:30am to make sure that blindingly bright circle wasn’t the sun! I drank 1 L of water to pre-load for the trip and took with me just 2 L, others brought 3L. Our plan was to refill from the lakes in Williamson Bowl as needed. From Pothole we went through a talus field approaching Shepard’s Pass and then climb the remaining 1000 ft up the pass to reach 12,000 ft. Once we crossed over the pass we saw Mt. Tyndall and amazingly beautiful western ridge lines running N-S through Seqouia. Pothole to Shepard’s Pass took about 1.5 hours for the 1.3 miles, partially from taking in the striking views of a sunrise against these magnificent mountains.

From here we walked past a sign that says “Now entering Sequoia” (past the sign above) and turned off the trail whenever we felt we had walked past the lake to our left. There is no maintained trail the rest of the way. We took some path of least elevation, basically walking towards Mt. Tyndall summit. Part of this walk took me through an area strewn with bright white, fist-sized hunks of Quartz. We were all in high spirits and it took us about an hour to cover the 1.5 miles and couple hundred feet to the rim of the Williamson Bowl.
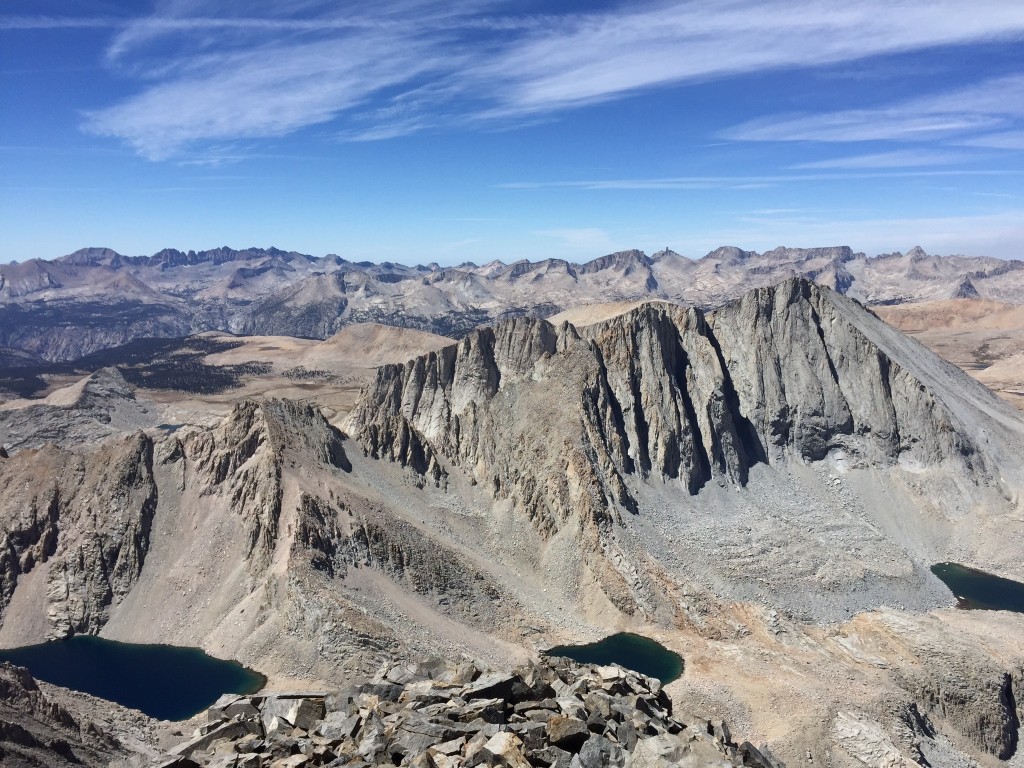
Williamson Bowl
From the bowl we could see Mt. Williamson, but not “the chute” we will use to go up it. From this vantage point the North approach of the mountain actually looks closer and a better route, but it isn’t. When there yourself, don’t mind not seeing the chute. it will be clear once you loop around the right side of the bowl and are at the base of the final approach.

Down into, and through the bowl there is very little help navigating. Cairns are everywhere marking a dozen parallel paths. I found myself thankful for having boots with ankle support walking through these talus fields. Hanging to the right of the bowl while keeping to the left of the lakes, we tried to take a path of least resistance. Going across the bowl felt tedious as we had lost a few hundred feet descending into it and it took about 1.5 hours to cover the mile to the last lake. From beside the last lake we saw the black stain and right above it see the the light (some say white) rock showing the chute’s entrance.

It was about 9:15am when we started up the approach up to Williamson from 12,000 ft. Getting up to the chute or the black stain looks pretty steep from the base, but it actually wasn’t so bad once we got into it. I recommend just heading straight for the stain, you’ll find cairns marking a route on the way. Once we were above the stain the chute was enormous. There was no missing it.
“The Mt. Williamson Chute”
There were two options up the 1500 vertical feet of chute to the Williamson Plateau. Either we could walk switchbacks up the dirt, cairn’d path and risk kicking rocks down on each other or use the larger boulders and scramble our way up. I personally preferred the boulder scramble since I was leading and I felt like the footing via these dirt trails was shit.

Three-quarters of the way up the chute our last man caused a rock the size of my torso to fall down the mountain towards the fellow summiteers we past. The rock picked up speed quickly, bouncing off the slope numerous times as high as three feet before it split into a handful of pieces and slowed down. It was scary, but luckily those descending below us had put enough distance in that they were safe.
There is no navigational decisions we had to make until we had been climbing for some time, about 2:40 hours since the base. We had seen what looked like forks a couple times to the right that turned out just to be bowes in the chute. However, at around 13,800 ft we saw a fork to the right a few 100 feet deep to what looked like a wall. This is the Class Three chimney.
“The Chimney”
Despite what other write ups have said, this does not feel like a scramble up the chimney, more like a vertical rock climb. If you haven’t done rock climbing before it may be quite difficult. The chimney goes up 35 yards or so and gets quite windy at the top. The wind made me worried I was going to top out on a ridgeline. To my relief I topped out onto a huge plateau.

From here we had amazing views of the valley between us and the next mountain range to the East, Sequoia to the North and a false summit to the South (directly right after coming up the chimney). Looping around this false summit, aiming for a little to the left of it and we arrived at the true summit of Williamson with a USGS marker and the ammo box containing the register.
Descent
After a half hour at summit being amazed at nature we started decent around 12:30pm. I actually should have brought more water, since I ran out at the top of the chimney. It took almost three hours to descend and I was severely dehydrated and had a headache by the time I reached the lake at the bottom of the Williamson approach. After one liter of water, a handful of gummy bears, a soaked shirt to cool me off, some ibuprofen and a half hour I was good to go.
I strongly recommend bringing a water filter so you can refill after descending Williamson. It still took us about three hours until we got back to camp. Making this a 13:45 hour, 9 mile and 4,400 ft elevation gain day. Tired, we decided to eat, rehydrate and hike out the next day.
Hiking Out
Starting down at 7am it took about 3.5 hours to reach the trailhead of about 8 miles, 1,500 ft ascent and 6,300 ft decent. The most surprising thing about this trip is how full the lakes and streams all were. Finding water wasn’t an issue at all. Also, despite my bad altitude sickness on Shasta, I had no problem this time. Maybe from sleeping at 11,000 ft the night before at Pothole instead of 9,400 ft for High Camp on Shasta.
I often like to read multiple write ups so I’ll recommend a couple. This one 14ers.com is the best, followed by this one from NorCal hikers.


